|
|
|
|
The Expense Budgeter is available for customers that prefer to manage budgeted expense entries for multiple projects on a single screen (possibly for multiple periods). This screen is comprised of Search, Budget and Summary tabs and is available to users with Administrator, Project Manager or Project Lead roles.
This screen can be used to view existing expense budget entries as well as add new expense budget entries.
Topics covered on this help page include:
The Search Tab (to define which projects/tasks, expense types and number/type of periods should be included in the resulting grid)
The Budget Tab (displays the grid budgeting edit screen for the appropriate time frame, projects/tasks and expense types)
The Summary Tab (displays a report with summary options including: by task, expense type or tasks and expense types)
You may also be interested in:
Project >> Expense Budgets >> Budget with Grid (for a similar grid management screen used to budget expenses for many time periods for a single project)
Manage Projects (Project Profile) (for more information about managing project attributes, assignments, etc.)
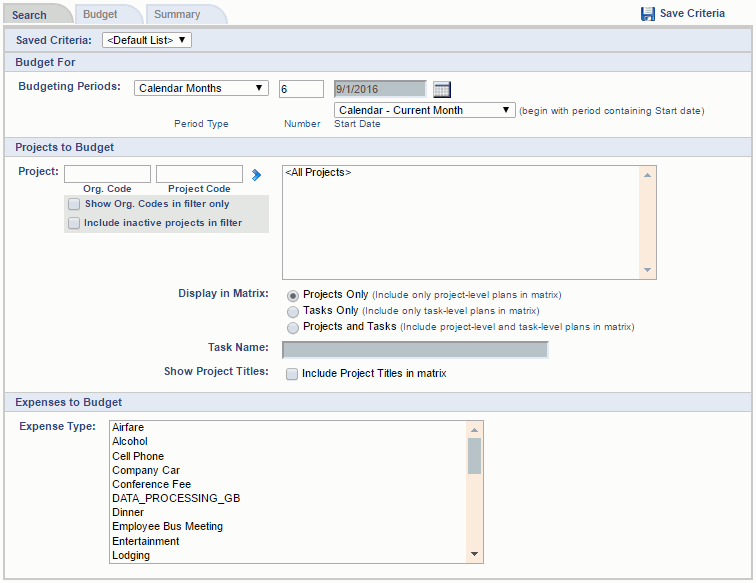
Using the Search tab, the Project Manager can control the layout and contents of the Budget and Summary tabs, such as whether the grid will include tasks, the number of periods included, whether the periods reflect days, weeks, months or quarters, and which projects, tasks and expense types will be available for viewing and planning.
Selection criteria for specific lists can be saved by clicking the (![]() ) link after criteria has been entered. This criteria can be later recalled on this screen by selecting a previously saved criteria from the Saved List drop-down. Individual saved criteria list can be managed via the Reports >> Saved screen in the My Lists section.
) link after criteria has been entered. This criteria can be later recalled on this screen by selecting a previously saved criteria from the Saved List drop-down. Individual saved criteria list can be managed via the Reports >> Saved screen in the My Lists section.
By default, all expense types previously budgeted for the project or specific task will be included in the resulting grid (even if they do not have an entry for the time frame specified). Using the Projects to Plan and Expenses to Plan options, the Project Manager can narrow down the set of projects / tasks and expense types that will be displayed on the remaining Plan and Summary tabs.
After supplying the desired selection criteria, click on the Plan tab to display the resulting matrix.
|
|
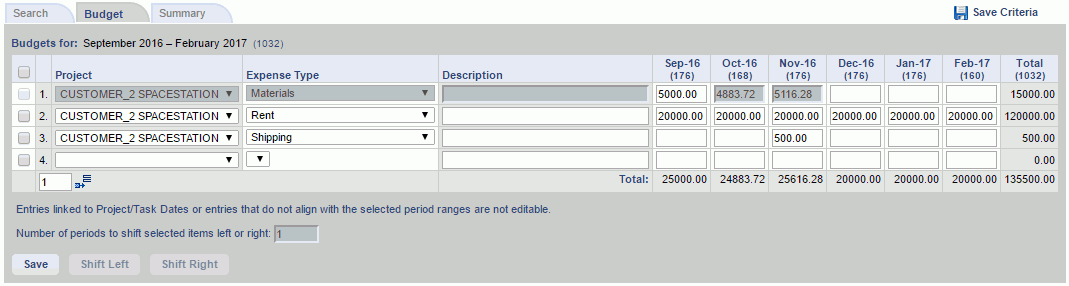
The resulting grid will resemble the following screen shot. The cells in the grid will reflect the expense amounts previously budgeted for a particular time frame (e.g. month). Additionally, the project manager can quickly add or change amounts via these cells.
When saved, these cell values will be translated into individual expense budget entries having a date range from the beginning of the period to the end of the period (e.g. a monthly July -08 entry will be saved as 7/1/08 --> 7/31/08). These entries can be viewed and edited via the other budgeting screens such as the Project >> Expense Budgets >> List .
|
|
This functionality provides for the ability to move the contents of a row of cells X number of cells to the right or left. When moving a populated cell, the values in the cell, as well as any override values associated with the cell (applicable to People Plans & Assignments only), will be moved. This feature may be helpful, for example, if you need to delay a project for one or several months and would like to shift existing entries without having to re-key them in.
The controls involved in this functionality include the leading check box on each row, the Shift Left and Shift Right buttons, as well as the Number of Periods entry field. Note that you can check the check box at the very top of the grid which acts as a toggle to check / uncheck all available check boxes in the grid.
To move cell contents:
Restrictions/Considerations:
Cells that have a grayed out value are not editable. Values appearing in the gray font indicate that the underlying date range for the entries do not align with a particular time period (e.g. in the case of monthly -- they would not fall on the 1st and last day of the month, for example, 3/1/05 --> 5/30/05). In these cases, the values for the underlying entries are evenly distributed across the monthly cells in an attempt to provide the resource planner/assigner with an idea of the total amounts for those periods, however, these entries cannot be modified via the grid screen (you'll need to use one of the other planning/budgeting maintenance screens).
Likewise, multi-cell bulk edit mechanisms will no longer be available for any rows or columns that contain a grayed out entry including the entire grid (i.e. Name) bulk edit mechanism.
If using the Plan Set feature (enabled via the Enable Multiple Plan Sets (unanet.plan_sets.enabled) property), and the plans you are viewing on the grid belong to a locked plan set, all cells on the grid will be grayed out (as you cannot modify plans belonging to a locked plan set).
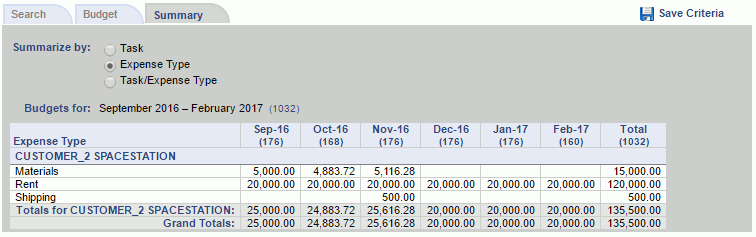
The Summary tab could be considered somewhat of a report of what has previously been entered for this project. Using the Summarize by options, you can control whether the details will be accumulated by task, expense type or both task and expense type.
The projects, expense types and time frame reflected on this tab are governed by the selection criteria entered on the Search tab.
![]()