|
|
|
|
This feature allows for the importing of Employee Type information into the Unanet system (including the Employee Type "container", but will not include the list of associated users, pay codes or expense types).
Note that you can also associate users, expense types and pay users via the user interface (via the Admin >> Setup >> Employee Type and Person Profile screens).
This screen is available to users having any of the following roles: Administrator and P&R Administrator
This feature is available with any Unanet edition.
Topics covered on this help page include:
Import File Record Layout (field by field descriptions)
Import File Format (generic rules and Excel spreadsheet tips)
Excel Template (spreadsheet template containing column headings)
Import Screen (invoking the import via the user interface)
IMPORTANT: Note that there are multiple places within this documentation that say you MUST use double quotes for the strings in your import. If you are working in Excel, Excel will provide the double quotes and thus you do not need to add them in manually. Manually adding double quotes within Excel would result in multiple sets of double quotes in the resulting .csv file and thus cause an error (should you attempt to import that resulting file). Please see Excel Tips for more information.
|
|
|
Field Header Name |
Required/Comments |
|
1 |
A |
Employee_Type_Code |
ALWAYS REQUIRED. This is the name you want to give the Employee Type entry and is a unique code. If you are trying to update the users in an existing group, you must have the exact name as it appears in the Unanet system. Maximum Length: 25 characters |
|
2 |
B |
Description |
Additional description or comments about this Employee Type. You can use the !BLANK! tag to remove an existing value. Note:
See the examples below for syntax help. Maximum Length: 128 characters |
|
3 |
C |
Active |
This field allows you to specify whether this Employee Type will be available for use on new person profile associations. The valid values for this field include "Y" for yes, and "N" for no. If you do not supply a value, the field with default to "Y". |
|
4 |
D |
Delete |
This field can be used to trigger the system to delete an Employee Type (including all of it's Users, Pay Codes and Expense Types). In order for the delete to happen, you must include the following text string !DELETE! in this field. Note that you cannot delete an Employee Type if it has any users associated with it. |
Note: Check out the Unanet Data Model for specific field data types, lengths, and other attributes.
The file to import must be saved in a comma delimited format. The fields can be enclosed in double quotes -- which would be particularly necessary should the data being imported contain commas.
grp1,,, -- This will create or update an employee type group (named grp1) having no description provided
grp1,!BLANK!,, -- Using the special tag !BLANK! -- this will remove the description from an employee type group (grp1) -- but will otherwise not impact any existing related entities.
grp1,,,!DELETE! -- Using the special tag !DELETE! -- this will remove the employee type group (grp1) and all of it's associated pay codes and expense types.
If you are not using the default column layout sequence as defined above, you must include a header record (prefixed with an asterisk *), containing the column Header Names for those columns you are including in the import file (to indicated what data is contained in each column). The specific Header Names for each column are listed in the table above.
Example:
#Delete example
*Employee_Type_Code,Delete
SubContractor,!DELETE!
Interns,!DELETE!
You can create the comma delimited import file with any number of tools. For those interested in using an Excel spreadsheet to create the file, you can download ![]() an Excel Template with predefined headers and required fields noted.
an Excel Template with predefined headers and required fields noted.
See the Excel Tips regarding the use of double quotes and more.
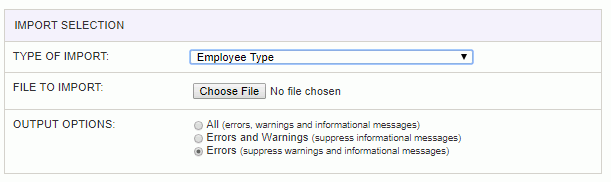
The Import Employee Type screen simply looks like:
|
Field |
Description |
|
Type of Import |
Select the appropriate import type from the list of available types of imports. |
|
File to Import |
Enter (or browse for) the file that you would like to import. |
|
Output Options |
Specify the level of detail included in the output. |
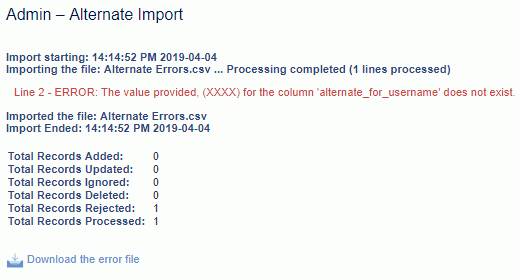
The import process is triggered by pressing the Import button. All Warnings and Error messages are written to the screen and can then be saved if desired. While some line items may be found invalid and rejected, the remaining line items will be successfully imported and saved in the database. The rejected line items will be written out to a file on the Unanet server as well as displayed at the bottom of the Import results page. The rejected record file name will be the import name (from the Type of Import drop-down on the Admin>> Import page) , concatenated with a space and "Errors.csv" (e.g., Item - Master Errors.csv, Alternate.csv, etc.). The file will be placed in the Unanet temporary directory (which is defined by the Temp Directory (Fully Qualified Directory Name) (unanet.temp_directory) Unanet property). You can also click on the Download the error file link at the bottom of the Import results page (sample image follows).
![]()