|
|
|
|
The Resource Request feature is available with the Project Portfolio license. This feature can be used to support a more formal process and collaboration between project and functional managers to help optimize project staffing and resource utilization. The Resource Request Search / List screens are available to users with the Resource Requestor, Resource Planner or Administrator roles. From this screen, you can search for and list existing resource requests or add new resource requests.
Topics covered on this help page include:
Searching for Resource Requests (to supply search criteria for existing resource requests)
Listing Resource Requests (provides access to view or further manage existing resource requests)
Data Security (who has visibility to resource requests)
Add Resource Requests (Resource Requestors create requests for resources)
Plan/Fulfill Resources for Request (Resource Planners fulfill requests for resources)
Accept or Decline Fulfillment (Resource Requestors accept or decline proposed resources)
Rework (modification to resource requests)
Resource Request Statuses (understand the changing statuses of a resource request )
Resource Request Flow Diagram (illustration of the process flow of a resource request)
Audit Trail (view status changes associated with a resource request)
Dashboard Widgets (dashboard shortcuts to resource requests requiring your attention)
Administrators (Administrators intervention)
Multiple Resource Planners (requests sent to multiple resource planners)
You may also be interested in:
Resource Request White Paper ![]() (download white paper for additional information about this feature)
(download white paper for additional information about this feature)
Resource Request Report (project oriented users have access to view resource requests)
Manage Projects (Project Profile) (for more information about managing project attributes, assignments, etc.)
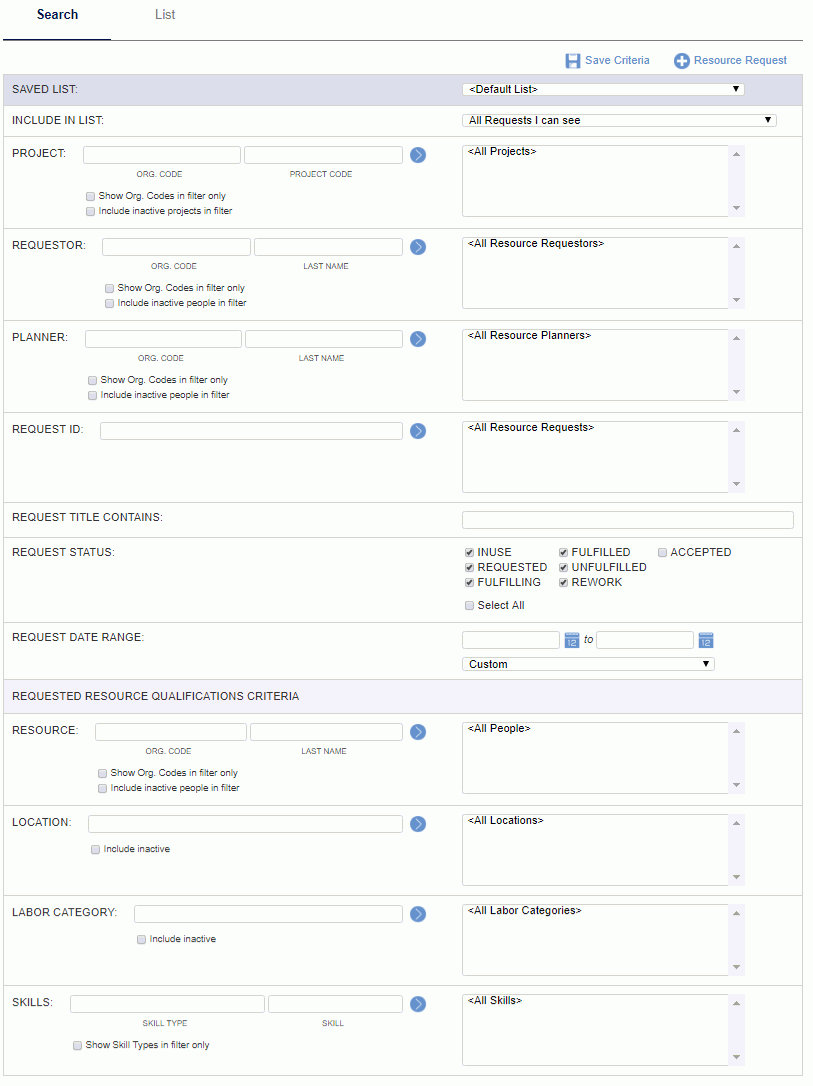
Using the Resource Request Search / List screen, you can choose to either display a complete list of all Unanet resource requests (by simply clicking on the List tab), or you can supply selection criteria on the Search tab to narrow down the results, and then click on the List tab to display the filtered list.
An example Search / List screen follows:
|
|
|
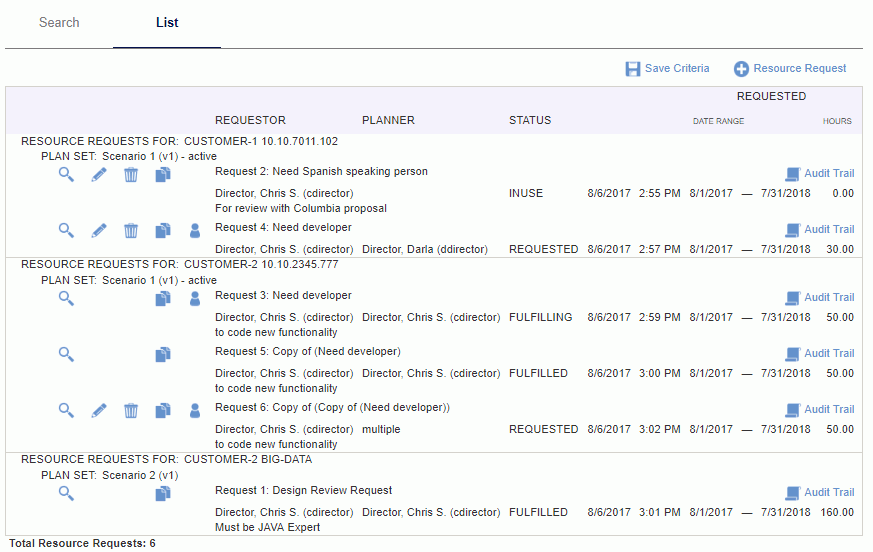
The filtered (or complete) list of resource requests will be limited by each user's role and their visibility based on Organization Access, explicit relationships with projects and who they have an alternate relationship with, and will resemble the following example:
|
|
|
 Data Security (who has access to resource requests)
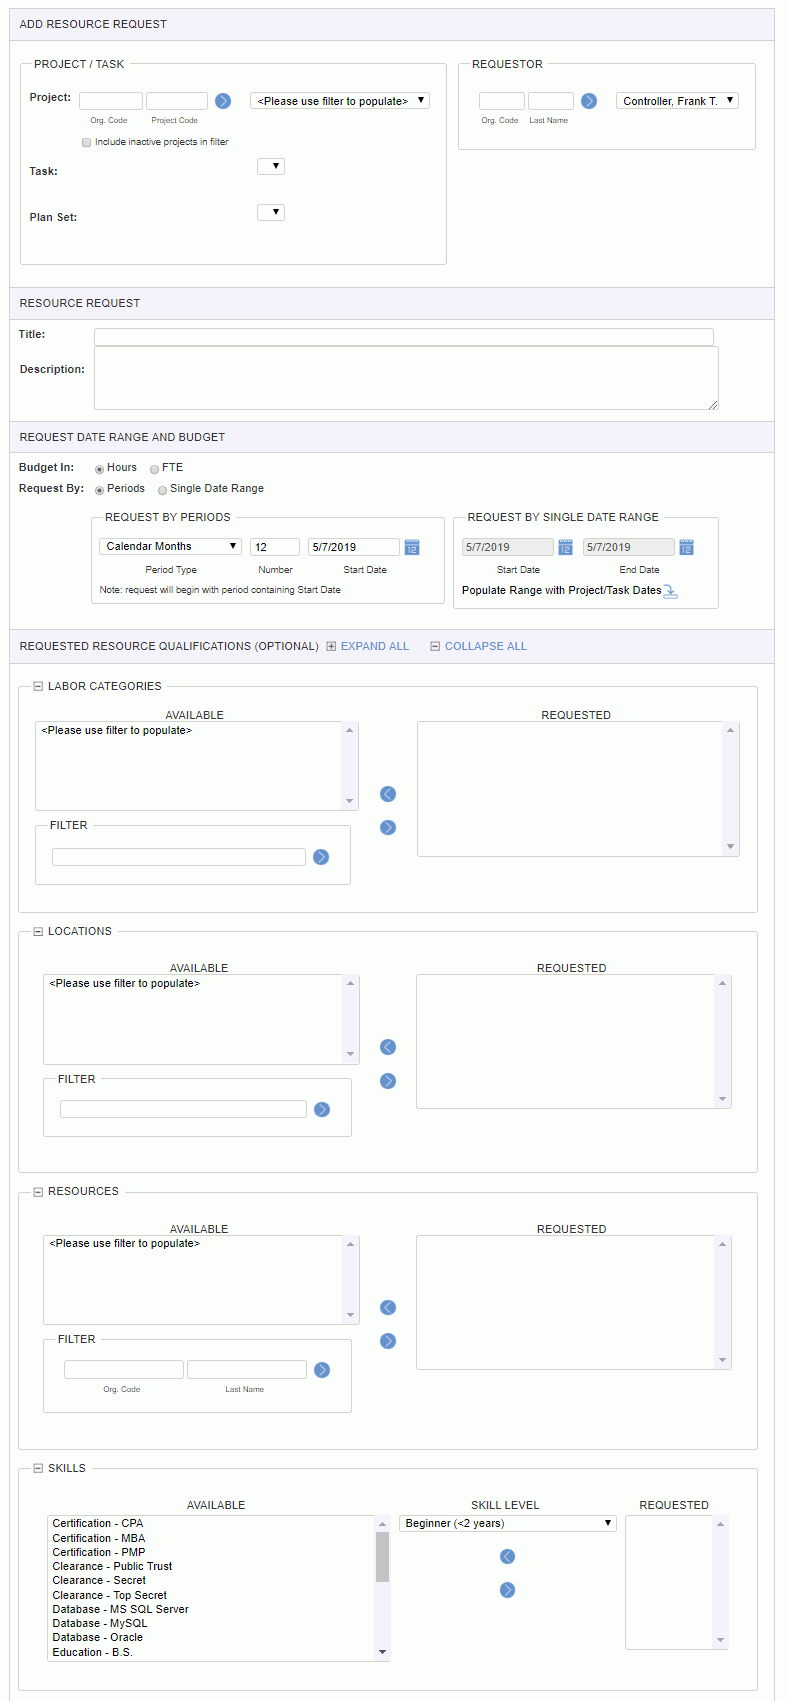
The first step in defining a new resource request involves the Resource Requestor defining various attributes about the request (e.g. for which project, description, whether you will be budgeting in Hours or FTEs, the date range for the request and other optional qualifying criteria).
|
|
|
After saving the initial attributes of a resource request, the Resource Requestor will need to provide the specific number of hours or FTEs being requested as well as designate who the possible Resource Planner(s) are that are being asked to fulfill the request.
See the note below for a possible approach to have multiple resource planners fulfill a single resource request (which is requesting multiple users).
|
|
|
|
Once a resource request has been submitted, the designated Resource Planners will be able to respond to the request by clicking on the ![]() Plan Resource icon from the Resource Request List. The request will be available for all Resource Planners specified on the request (that is, it will appear in their list of available requests to fulfill and on their dashboard resource request widgets), but once any one Resource Planner begins editing the request, it becomes unavailable to the other Resource Planners.
Plan Resource icon from the Resource Request List. The request will be available for all Resource Planners specified on the request (that is, it will appear in their list of available requests to fulfill and on their dashboard resource request widgets), but once any one Resource Planner begins editing the request, it becomes unavailable to the other Resource Planners.
The Resource Planner will initially be presented with a screen that resembles the following. This screen provides a recap of the resource request including the periodic hours/FTEs requested.
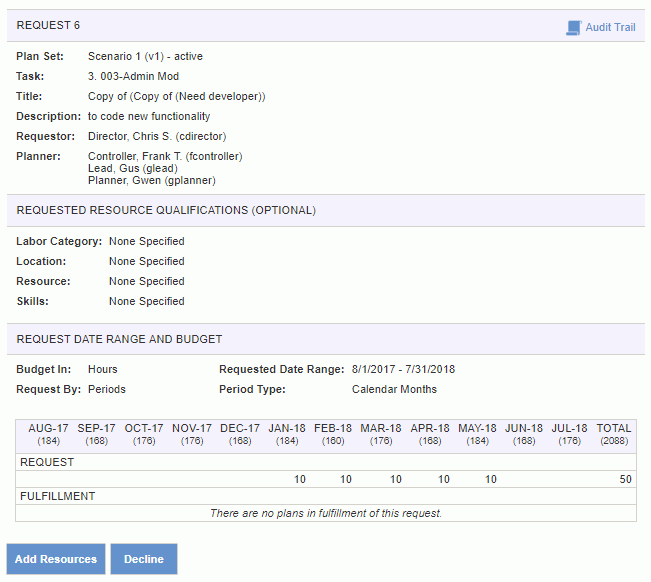
|
|
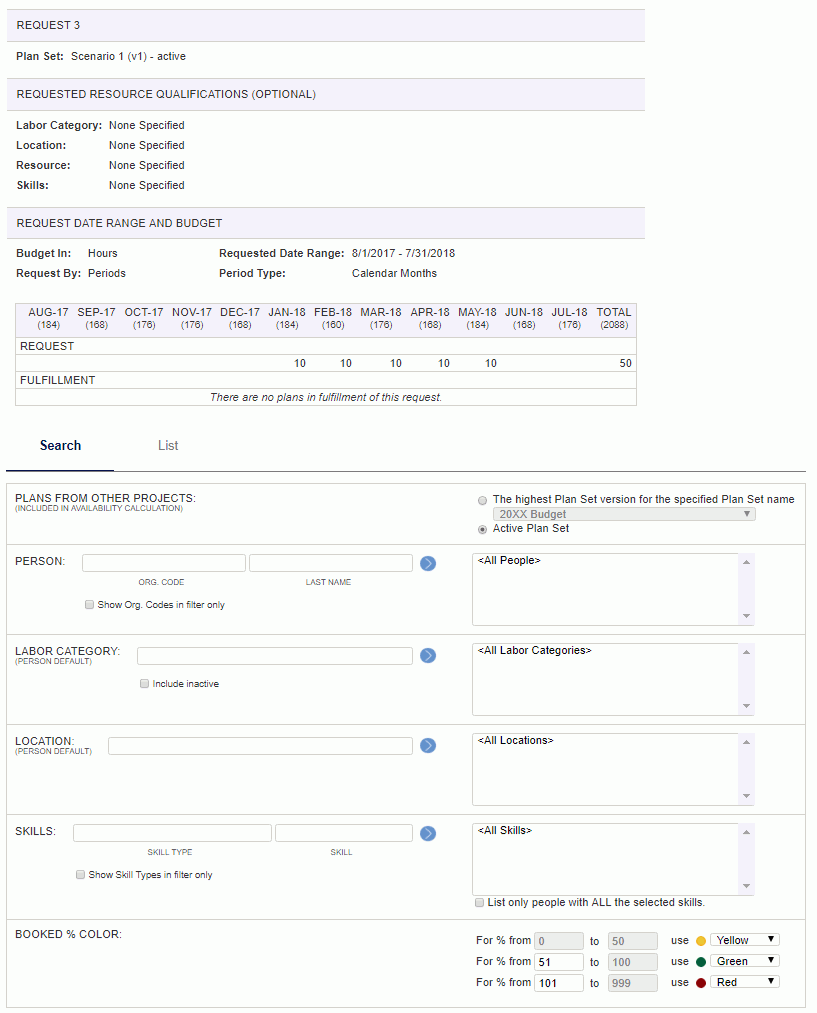
The Resource Planner will have initially navigated to this screen by having clicked on the Add Resources button discussed above. This screen will include a recap of the resource request attributes in the upper portion of the screen. In the lower portion of the screen, the Resource Planner can begin the process of identifying potential users to include in the fulfillment of this request.
The search criteria available will allow the Resource Planner to filter potential candidates by their skills, default labor category, default location and even by name or person organization. The Booked % Color search criteria can also be used to customize the output presented on the resulting List tab to help identify users having an existing threshold of available capacity.
User Allocation Calculation
User allocation will be calculated as follows:
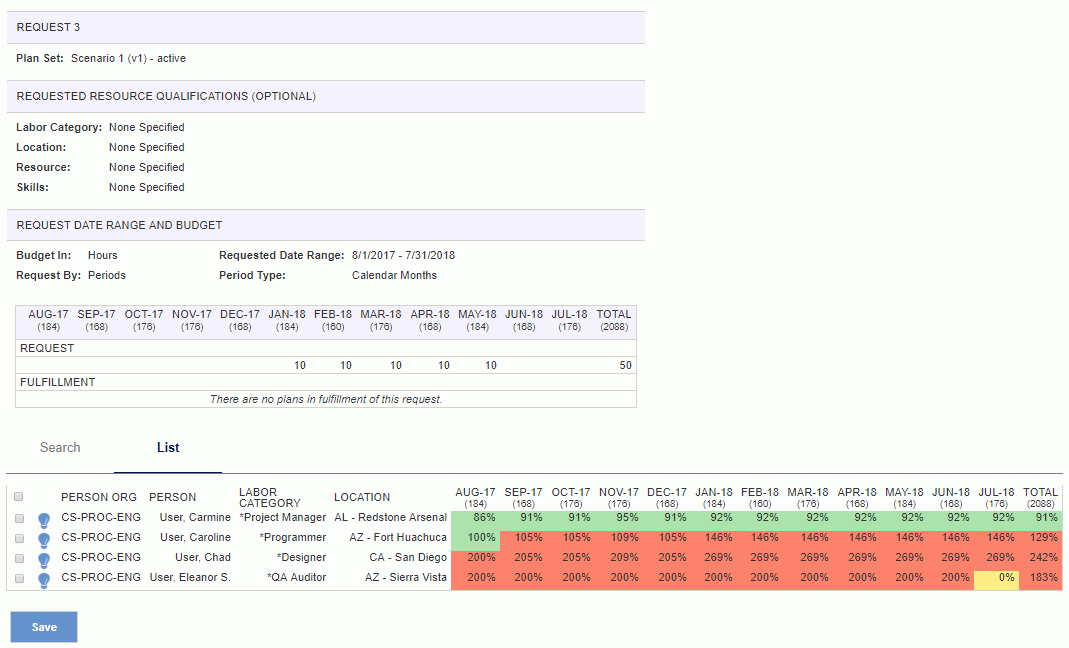
After populating the optional values on the Search tab, the Resource Planner will click on the List tab and will be presented with a screen resembling the following. Once again, this screen will include a recap of the resource request attributes along the upper section, and the lower section will display a output that resembles the Resource Allocation report. This display will include any users matching the selection criteria specified on the Search tab, along with a readout of their default Labor Category and Location from their person profile. The periodic section will include details as to how booked each resource is based on the color scheme defined on the Search tab.
Using this information, the Resource Planner can return to the Search tab to refine the search criteria, or move forward with the fulfillment process by checking the check box next to one or many entries (or all by selecting the check box at the top of that column). The Resource Planner can also review a particular users skills by clicking on the ![]() skills icon. After identifying resources to include, the Resource Planner will click on the Save button to proceed.
skills icon. After identifying resources to include, the Resource Planner will click on the Save button to proceed.
After having clicked on the Save button, the Resource Planner will be presented with a screen resembling the following. This screen contains enterable cells for the periods and users specified. This screen has functionality similar to the Plan with Grid screens in that you can enter budget information in the cells, as well as double click on a particular cell or user's name to edit additional attributes (i.e. bill rate, cost rate, etc).
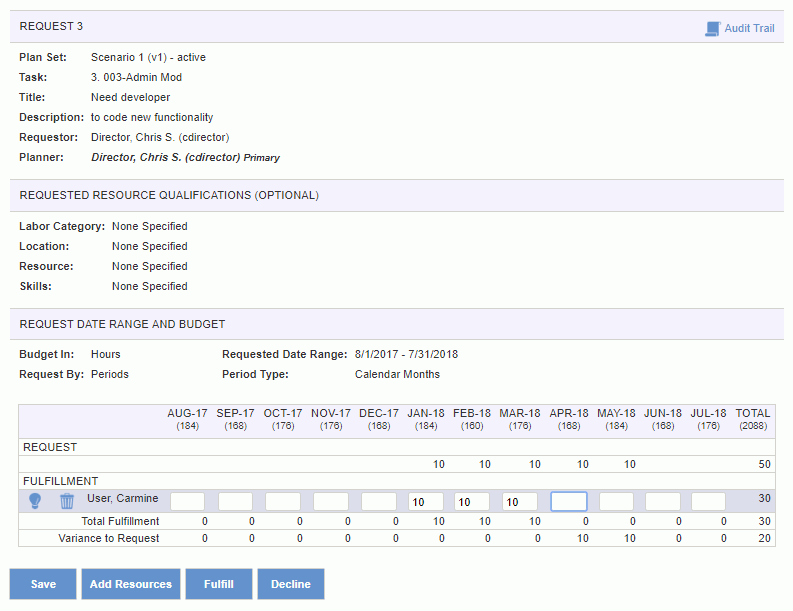
As individual entries are made, the screen will update the Variance to Request amounts along the bottom such that the Resource Planner can easily keep track of how much still needs to be planned for a particular period.
|
|
|
Note: Plans that are created in response to a Resource Request can only be managed via these resource request screens.
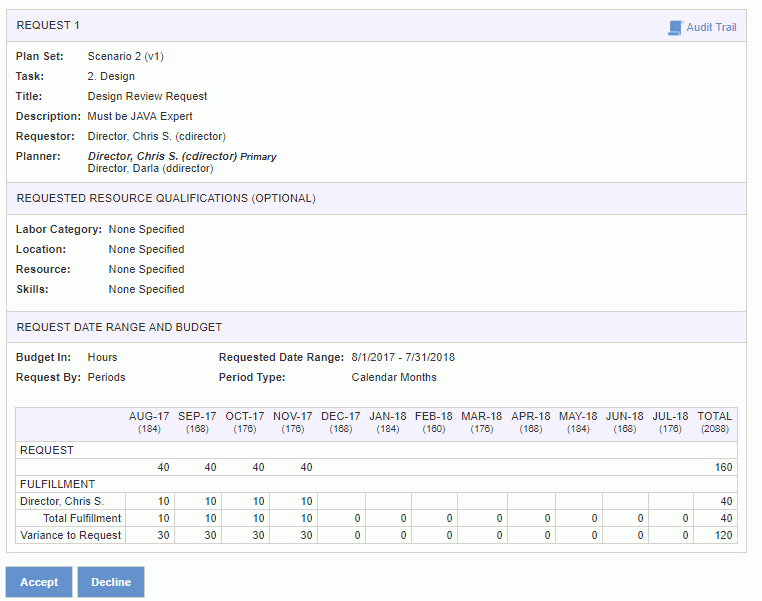
Once the Resource Planner has attempted to fulfill a request, control returns to the Resource Requestor to review the fulfillment to either Accept or Decline the proposed resources. The Resource Requestor can make this choice by clicking on the ![]() eye glasses icon from the Resource Request List, and upon doing so will be presented with a screen resembling the following:
eye glasses icon from the Resource Request List, and upon doing so will be presented with a screen resembling the following:
|
|
Changes During Original Request
A resource request may need to be modified during the original requesting process as well as after final acceptance. During the original process flow, the Resource Requestor may "Decline" the proposed fulfillment, supplying a reason when returning the request to the Resource Planner for further action. The status would be updated to reflect "REWORK".
Resource Requestor Changes After Acceptance
After a resource request has been Accepted, the Resource Requestor can make and save changes to the request without a change of status (by clicking on the edit ![]() icon in the Resource Request List). They can also choose to formally pull the request back into the "REWORK" status returning control to the Resource Planner for further action.
icon in the Resource Request List). They can also choose to formally pull the request back into the "REWORK" status returning control to the Resource Planner for further action.
Resource Planner Changes After Acceptance
After a resource request has been Accepted, the Resource Planner can only make additional changes to the planned resources by pulling the request back into the "REWORK" status. These changes can be initiated by clicking on the edit ![]() icon in the Resource Request List.
icon in the Resource Request List.
Allow Multiple Planners to fulfill a single Resource Request
In cases where multiple resource planners have been assigned to a resource request, the first Resource Planner may or may not be able to fulfill the entire need. In such cases, the REWORK process can be used to allow other Resource Planners to attempt to fulfill the request. This process could work as follows:
A resource request can have one of the following statuses:
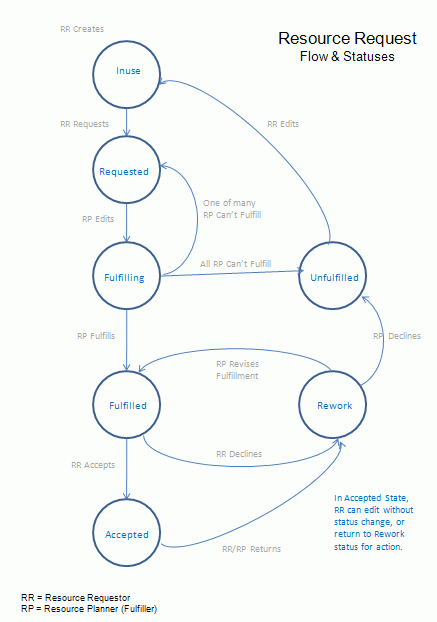
INUSE -- Only users having the Resource Requestor or Administrator roles can create resource requests. Newly created resource requests will have a status of "INUSE". Requests in this status will be visible to Resource Requestors but not Resource Planners.
REQUESTED -- Once a resource request has been created and submitted to be filled, it will have a status of "REQUESTED". Resource Requestors will submit the request and once submitted it will be visible to both the Resource Requestor and the Resource Planners.
FULFILLING -- As soon as a Resource Planner begins working on the fulfillment process, the status of the request will move to "FULFILLING". During this status, the Resource Requestor can make no further changes until the Resource Planner has either fulfilled or declined the request.
UNFULFILLED -- Those requests that all Resource Planners cannot fulfill and have declined will be updated to "UNFULFILLED".
FULFILLED -- Those requests that the Resource Planner has planned resources against will be fulfilled and the request status will be updated to "FULFILLED".
REWORK -- Resource Requestors can alter the request attributes for a request while it is originally flowing through the process or even after final acceptance. When this type of alteration occurs, the status of the request will be updated to "REWORK".
ACCEPTED -- After the Resource Planner has provided resources in response to the request, the Resource Requestor has the option to accept the provided resources in which case the status of the request is updated to "ACCEPTED".
The following diagram illustrates the Resource Request flow and how the statuses may change as a request progresses through the process and which user (Resource Requestor or Resource Planner) can operate on the request at a particular step in the process.
The  Audit Trail link appears on a number of Resource Request related screens, such as on the Search / List screens. Clicking on this link will present the user with a history of the status changes for a particular resource request. The audit trail will include who made changes that resulted in status updates, when those changes were made and if the person was acting on behalf of another user (i.e. they are an alternate).

The rules above describe which user or users can access a Resource Request depending on which status the request is in (and this is tracked in the audit trail). Do note that Administrators can also access Resource Requests. If a primary planner has been identified, the audit trail entry will appear as if the administrator was doing the work on behalf of the primary. If no primary planner currently exists, then the audit trail will reflect that the Administrator is performing the work on their own behalf.
Users having either the Resource Requestor or Resource Planner role will notice a widget on their Home and Forecast dashboards. This widget will provide a summarized list of the Resource Requests visible to that user by request status and whether they have a primary or alternate relationship providing that visibility.
Users can click on the various data within the widget to quickly navigate to the Forecast >> Resource Request list screen for that corresponding request.
The Add Resource Request icon is also available on the dashboards to facilitate a quick means to create a new resource request.
When multiple Resource Planners have been identified as being able to fulfill a request, those resource requests in the "Requested" status will appear on this widget for those users until such time that they or another Resource Planner edits the resource request. Once one of the Resource Planners begins to work on the request, it will no longer appear for the other designated Resource Planners.
If a Resource Planner edits the request and then declines to fulfill that request, it will again appear on the other identified Resource Planners dashboards (those that did not already decline it themselves) in the "Requested" status.
