|
|
|
|
The timesheet is the primary vehicle available for the collection of time entries.
Topics covered on this help page include:
The Timesheet ( the anatomy of the timesheet body)
Timesheet Validations (built-in and custom validation processes)
Previewing Timesheets (for a standard printable view of timesheets)
Purchase Order Assignments (mapping Timesheet cells to Purchase Orders)
ETC Collection (allow users to record ETC while entering time)
Signature View of Timesheet (for a customizable printable view of timesheets)
Audit Trail (optional feature to track all changes to timesheets)
Timesheet Auto-Fill (includes last period's project/task entries on current period -- w/o hours and comments)
Historical Timesheets (timesheets marked as Historical cannot not be edited, adjusted or removed via the user interface)
Overtime (link to more help for possible overtime handling options)
You may also be interested in:
Listing Active and Completed Timesheets (Time >> List menu option)
My Projects (user screen used to help manage which Projects and Tasks will appear in the timesheet drop downs)
Missing Project/Task (if you are having difficulty understanding why a particular project / task is not appearing on a user's timesheet)
Timesheet Adjustments
End User Timesheet Adjustments (user ability to modify EXTRACTED or LOCKED timesheets)
Administrator Timesheet Adjustments (administrator ability to modify EXTRACTED or LOCKED timesheets)
Time In / Out (capabilities to capture Time In / Out entries at the Daily or Project level)
Printing Tips (a few browser suggestions for improving printed output)
Timesheet Statuses (review the sequence of statuses a timesheet progresses through)
AutoLock (property driven feature allowing COMPLETED timesheets to immediately graduate to a LOCKED status)
Quick Topic - Putting a certification or signature line on the timesheet
Purchase Order Assignments (mapping timesheet cells to a Purchase Order for subcontractors)
Quick Topic - Capturing subcontractor hours and expenses in Unanet for non-Financials customers
To initiate the creation of a new timesheet, simply click on the (![]() ) timesheet add icon. This icon is available on a number of dashboards as well as on the Time >> List screen. This screen may also appear by clicking on the Time >> Current option (when no current timesheet exists)
) timesheet add icon. This icon is available on a number of dashboards as well as on the Time >> List screen. This screen may also appear by clicking on the Time >> Current option (when no current timesheet exists)
On this screen, you simply enter a date (any date that falls within the timesheet time period you would like to create) and a new timesheet will be created.

If a timesheet for that date already exists, it will simply be displayed on the screen.
Administrators have the ability to prevent additional timesheets from being created on a time period by time period basis (via the Time Period screen).
Overlap Time Periods Note: If the current user has a Weekly Overlap or Every Two Weeks Overlap type of time period and the date they enter is the overlapping day, the resulting timesheet will start on the overlap day.
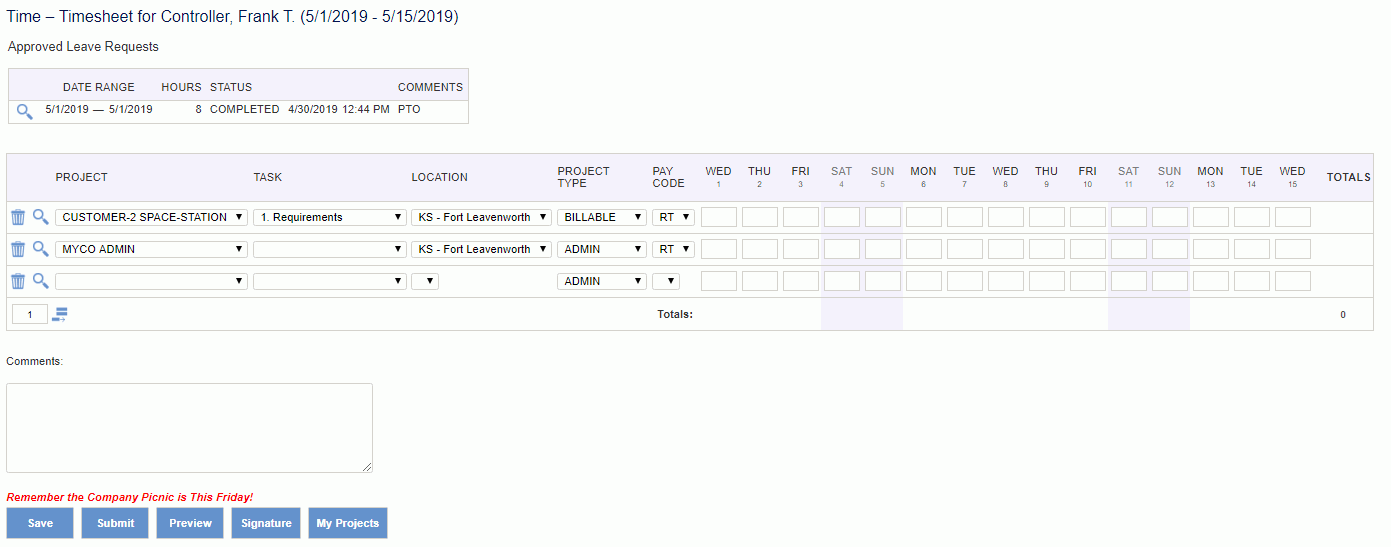
The number of days included in a timesheet may vary depending on the time period setting in each user's profile. Displayed below is an example timesheet for a weekly time period.

|
|
|
Which Projects/Task are Available
The projects and tasks that appear in your timesheet will be those projects / tasks that a particular user has been assigned to. End users can further control which assigned projects/tasks will appear in their timesheet drop-down lists via the My Projects screen. If you are having difficulty understanding why a particular project / task is not appearing on a user's timesheet, check out the Missing Project/Task section on the My Project's help page.
In addition, if the project is managed at the task level, then only tasks that allow Time Reporting will be included.
If the project is managed at the project level, and the project requires tasks for Time Reporting, then only projects with at least one task that allows Time Reporting will be included.
If the project is managed at the project level, and the project does not require tasks for Time Reporting, then only projects that allow Time Reporting at the project level or have at least one task that allows Time Reporting will be included.
Legal Entity / Financial Org Restrictions
When the Use Financial Organizations (unanet.financials.use_financial_orgs) property is enabled, the list of projects may be further constrained.
These restrictions will be enforced on timesheet save and submit. If a Task is being charged to and it has an Owning Org specified, it too will have the same Owning Org validations performed. Further, these validations will only apply to timesheet work dates >= any value set in the Use Financial Organizations Effective Date (unanet.financials.use_financial_orgs.eff_date) property.
Show/Hide Details
If the Show Organization on Timesheet (unatime.timesheet.org.display) property is being used, the Project Organization code may be suppressed in your editable and preview timesheets.
Likewise, if the Show Project Title on Timesheet (unatime.timesheet.project.title.display) property is being used, you may see the Project Title concatenated onto the Project Code in your editable and preview timesheets.
Further, if the Show Project Title Hover Text on Timesheet Edit (unatime.timesheet.project.title.hover) property is being used, you can display the Project Title associated with a project by hovering your mouse over the Project Code field.
Finally, if the Enable Leave Request (unatime.leave_request.enabled) property is being used, you will see a Summary of Approved Leave Requests that overlap the current timesheet above the editable timesheet.
|
|
|
It is possible to add custom text along the bottom of the editable version of the timesheet using one of the Timesheet Edit Page Footer for xyz Users (timesheet.edit.footer) properties. These properties can be customized by user classification (i.e. salaried, hourly, non-employee, non-employee (PO)).
If you are interested in adding customized text to your timesheet preview, you may be interested in enabling one of the Timesheet Preview Footer for xyz Users (timesheet.printview.footer) properties. With these property settings, you can add custom text such as signature lines or policy statements (on the preview version of the timesheet). These can be customized by user classification (i.e. salaried, hourly, non-employee, non-employee (PO)).
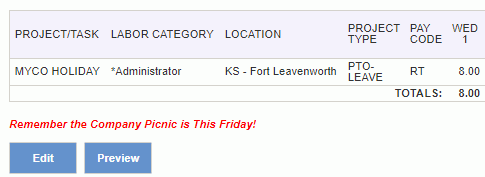
When enabled, a new Signature button will appear at the bottom of the editable and preview versions of the timesheet, which will take you to a modified preview version of the timesheet that contains the supplemental verbiage. These property entries can include basic html formatting. An example of what you could include follows. The additional text will appear under the "cell details" section.

Note that on the properties that allow for the inclusion of HTML tags to provide formatting, here are a few basic tags that you might find useful.
For example, the following text included in a property...
<font color="red">This is red</font>
<b>This is bold</b>
<i>This is italic</i>
<font color="red"><b><i>This is red, bold and italic</i></b></font>
...would yield this output:

Notes:
If you want line breaks, you can use <br> tags (no closing tag required).
Remember to close each tag in the order you open them.
Most other html tags are valid (<p>, <div>, <table>, etc.), but you might want to keep it as simple as necessary to avoid the need for debugging.
Remember that this will not work in the messages that appear in pop up windows (the three submit confirmation pop ups) as these are not html.
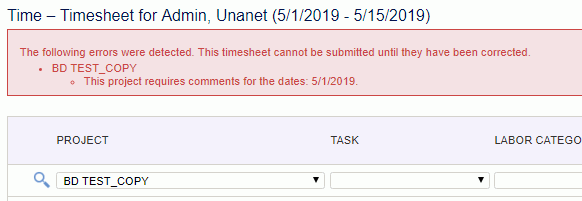
When the timesheet is submitted, the system will revalidate that an assignment exists (allowing the user to charge to that project for each day entered), and confirm that no Budget amounts have been exceeded (should an Assignment Budget value have been specified). Additional rating and system validations may occur and as a result, you may encounter two general types of errors. First, those errors that prevent the saving of your timesheet (e.g. you've entered an invalid character in a numeric field), and secondly, entries that are syntactically correct, but may violate an assignment or some other rule. In the latter case, the timesheet will save successfully, however, you will see the error messages displayed across the top of the screen. Timesheet submittal will not be allowed if theses types of errors exist.
Below is an example of this type of error message.

In addition to the business rules defined by setting project profile options, assignment date ranges, budget constraints, etc. you can also create additional customized validations using the Timesheet Stored Procedure feature.
Legal Entity Requirement
When using Unanet Financials (Use Financial Organizations (unanet.financials.use_financial_orgs) property enabled), the legal entity of the Project's Owning Organization must be the same as the legal entity of the person organization for each cell (when the person organization is designated a Financial Organization).
Whether the above validations are enforced may also depend on whether the Use Financial Organization Effective Date (unanet.financials.use_financial_orgs.eff_date) property has been set.
In addition to the editable version of the timesheet, users can also view a non-editable preview version. This version may be more suitable for purposes of creating a printed copy (also see the Print Friendly icon in the upper right hand corner of the Timesheet Preview).
Whether the user's classification is displayed on the preview version of the timesheet (next to name in the title) can be controlled by the Show Classification on Timesheet Preview (unatime.timesheet.classification.display) property.
Which sections are collapsed upon initial display of the timesheet preview can also be configured by your administrator via the various Timesheet Preview Defaults (unatime.preview.expand) properties. If you desire to review the details in these sections, you can expand or collapse these sections using the or (![]() or
or ![]() ) controls.
) controls.

Custom Logo on Timesheet Preview
Administrators can configure the preview version of the timesheet to include a custom logo that will replace the standard Unanet hour glass icon. To enable this feature, the Administrator will need to load up the custom images via the Admin >> Setup >> Images screen (defining images of type "timesheet view").
Note that the legacy method of defining timesheet preview logos involved setting the following properties (Image Source (unatime.preview.logo.src), Image Alt Text (unatime.preview.logo.alt), and Image URL (unatime.preview.logo.url)). Should these properties be configured in your installation, you should consider removing them and using the Admin >> Setup >> Images screen instead.
If the project requires a Non-Employee (PO) to use a PO (see Project Profile >> Time tab), the PO/Line # field will be populated for user's classified as Non-Employee (PO) on any day in the timesheet's time period. The timesheet cell will be mapped to the PO based on project, labor category, and date. See Purchase Order Assignments for more information.
Auditing allows for additional historical tracking of changes. This feature must be enabled by the system administrator (via the Enable Timesheet Audit Trail (unatime.audit) property). When this feature is enabled, you will be prompted to enter a Change Reason for any alterations to your timesheet on a cell by cell basis. These Change Reason comments will be viewable in the timesheet Audit History section. This feature is frequently used in conjunction with DCAA Compliance.
If you attempt to submit your timesheet without having supplied a change reason comment for all changed cells, you will be prompted again and the submit will not be allowed until you have supplied the required entries.
Pre-Defined Change Reasons
Your system can be configured to allow for the entry of free form text as the change reason, or the Unanet Administrator can provide a pre-defined set of Change Reasons for users to select from via the Admin >> Setup >> Change Reason screen. If no Change Reasons have been defined by the Administrator, free form text entries will be allowed (and the Change Reason drop-down list will not appear). When pre-defined Change Reasons exist, the text entry field will be disabled and the user will need to select a reason from the list of available options.
Your system can also be configured to support both approaches by enabling the Include Other Audit Trail Change Reason (unatime.audit.allow_other_change_reason) property. When set to true, the Change Reason drop-down list will include an additional option of "Other", which when selected will allow the user to enter their own free form text. Thus, they will have the option of selecting a pre-defined reason code or providing their own custom reason.
The value displayed in the drop-down corresponds to the Change Reason Code and the value displayed in the text entry field is the Change Reason as defined on the Admin >> Setup >> Change Reason screen.
Note that the specific text in the text entry field is what is saved in the system database. Should the administrator subsequently change the Change Reason text associated with a Change Reason Code, the original text will remain with any timesheets having previously used those reasons.
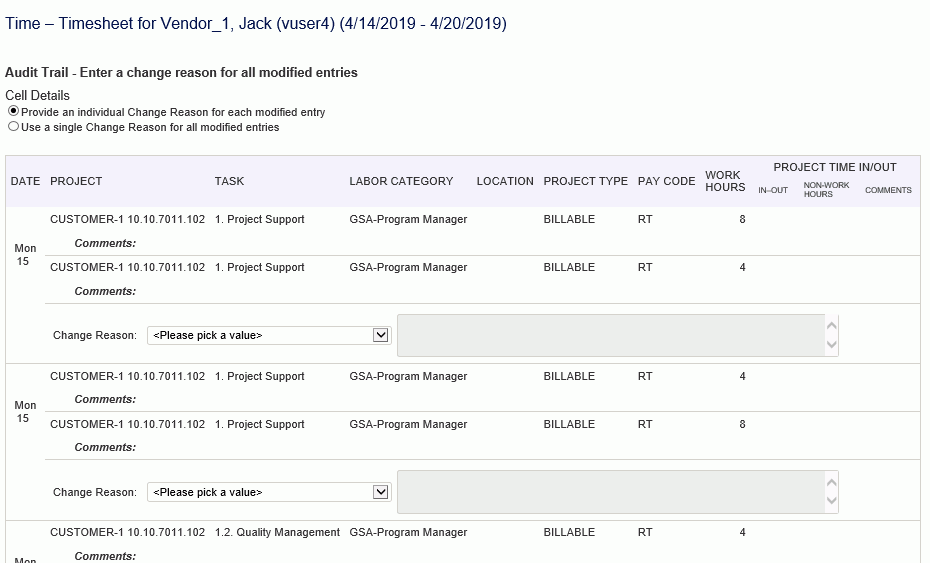
The Change Reason screen will resemble the following:

Using the radio button option at the top of the screen, the user can choose to make individual entries per changed timesheet cell, or a single entry that will apply to all modified timesheet cells.
If the Enable ETC Collection on Timesheet (unatime.etc_collection.enabled) property is set to true, then timesheet users will have the ability to update estimate to completion information for assignments associated with each row on their timesheet. This can be accomplished while entering time on the timesheet by clicking on the eye glasses (![]() ) icon.
) icon.
When this property is enabled, the standard project information popup will include a listing of any assignments for that user that overlap the project / task / dates reflected on that particular timesheet row. The data presented is in a format similar to the user's Schedule Detail report (which users, managers and project managers can now run to view the latest ETC information.
The project information popup will resemble the following:

In order to update the Hours (ETC) or Date (EDC) Estimated Date of Completion values, you must first enable the field for update by clicking the check box at the far left of a particular row. Whenever updating the values in these fields, the Last Updated On date is also stamped with the current date. When checking the check box on a particular row, the Last Updated On date will be updated on that row even if you make no changes to the other editable fields. This allows you to indicate that as of a certain point in time what ever the values are in those other Estimates to Completion fields are valid (ie even though another week has elapsed, your previous ETC estimate has not changed and you still have that much work remaining). This is of importance when you plan to use the Calculated Hours estimate values (as it revises the entered ETC values considering additional actuals that have been entered since the Last Updated On date).
See ETC Wizard for more information about managing ETCs.
No Assignments
If there are no assignments governing the current project / task (e.g. this is an open self assignable project or org level assignment), then the popup will include a message similar to the following:

This mechanism is available to update ETC information on a project by project basis while editing the timesheet. If the timesheet user is interested in updating ETC information in bulk, they can use the Time >> ETC screen. User's can also view recorded ETC information via the User Schedule Detail report.
Project Managers can view user entered ETC information via the Project Schedule Detail report, and the Assignment and Task listings on specific projects. Resource Assigners can directly edit the user ETC values on the various Assignment screens (or via the Assignment Import).
Managers can also view user entered ETC information via the People Schedule Detail report.
See ETC Wizard for more information about managing ETCs.
When the user selects the Auto-fill option in their user Preferences, the timesheet will automatically include any Project / Task entries that had time reported for the preceding time period. The hours and comments will be blank, but the entries will be displayed on the current periods timesheet (saving you some typing). This may be useful if you charge time to the same projects period after period.
Not all projects used on the previous timesheet will be carried forward. Reasons for this may include; a project or task has since been closed, the project or task's end date has passed, the user's assignment end date has passed or the assignment was removed, etc.
Legal Entity / Financial Org Restrictions
When the Use Financial Organizations (unanet.financials.use_financial_orgs) property is enabled, the list of available projects and tasks carried forward from the previous timesheet may be constrained to ensure that they each have an Owning Org (which is a Financial Org). This restriction will only apply to users having a classification of exempt or non-exempt as of the time period end date.
Note: If auto-fill is enabled, you cannot remove a project that is on your current timesheet (e.g. carried forward from last period). You may attempt to remove it, however, the next time you access your timesheet, the entry will auto-fill in again. For this reason, it is not uncommon for a user to enable auto-fill at the beginning of a time period -- and after recording time for the desired projects during your first access to a timesheet, subsequently disabling the auto-fill feature for the remainder of that time period.
To facilitate the loading of Historical Time entries in the system, the Time - Historical Import allows for the insertion of time records that will be designated as Historical Timesheet entries.
The details related to these entries will not be distinguishable from regular time entries on any standard reports. Timesheets designated as historical, will have an indication on the timesheet previews and also identifiable when appearing in timesheet lists ("historical" will be appended to the status).
Historical time will be frozen from change and thus will not participate in any editing, adjusting or deletion (via the UI) to include re-rating and dilution calculations. Historical data will remain as it was imported.
Historical time can be removed via the Time - Historical Import (see First Purge option) so long as the time has not been included in a Labor Cost Post or Billing and Revenue Post.

For more information on possible best practices for managing overtime within Unanet, see the Overtime Knowledge Center Quick Topic.