|
|
|
|
Unanet has several mechanisms available for adjusting timesheet entries once they have been LOCKED or EXTRACTED. The End User Adjustment mechanism allows users to make adjustments to their timesheet by directly applying changes to their timesheet. These adjustments will flow through the user's current approval process (just as original timesheets do).
Note that you will not be permitted to edit any timesheets designate as Historical Timesheets.
This help page provides an overview of the End User Adjustment feature, detailing:
You may also be interested in:
Administrator Timesheet Adjustments -- Administrator's have a similar yet separate adjustment mechanism. The Administrative feature is necessary if you need to make an adjustment to a bill rate, cost rate, bill org, cost org or location -- e.g. fields that do not appear on the timesheet itself. Administrator Adjustments do not flow through the approval process.
The end user adjustment feature is always available for Administrators (so long as the Allow Admins to Edit Timesheets (unatime.admin.edit) property is enabled) and optionally enabled for timesheet users via a property. When enabled, administrators can control which time periods will allow adjustments.
Master switch to enable / disable feature -- (Enable End-User Adjustments (unatime.end_user_adjustment.enable) -- Setting this property to a value of true will enable the end user adjustment capability for timesheet users.
Time Period by Time Period Control -- once enabled, your Administrator can further control which time periods will allow end user adjustments. The Setup >> Time Periods screen can be used to specify, on a time period by time period basis, which time periods allow end user adjustments. For example, you may only allow end user adjustments for the current calendar year or current quarter. Using the Setup >> Time Period Setup screen, the Administrator can also specify whether each new time period created should allow adjustments or not by default (see the Allow User Adjustments field for more information).
Several users / roles may have the ability to create an end user adjustment.
Timesheet Users -- Regular timesheet user's will have the ability to make adjustments to their own timesheets.
Timesheet User Alternates -- Alternates will have the ability create timesheet adjustments via the Delegates menu.
Managers -- If the Allow Managers to Edit Timesheets (unatime.manager.edit) property is enabled, any managers in your approval group will have the ability to create or edit end user adjustments on their user's behalf.
Administrator -- If the Allow Admins to Edit Timesheets (unatime.admin.edit) property is enabled, any administrators (or hr administrators) in the system will have the ability to create or edit end user adjustments on other user's behalf. Administrators also have an additional mechanism in the Administrator Timesheet Adjustments screen (which can be used to make adjustment to other items such as bill and cost rates).
Note: if your system is configured with one of the post review properties (e.g. Require User Review (unatime.user.review.required)), adjustments submitted by someone other than the timesheet owner or approved by an alternate approver will require a review comment by the primary user just as with any standard timesheet action.
Only timesheets that have previously been EXTRACTED or LOCKED are available to be modified via the end user adjustment mechanism. If your timesheet has not yet been EXTRACTED or LOCKED, you can simply edit the timesheet by clicking on the edit pencil icon on your Active list of timesheets and apply the changes directly. Depending on the status of your timesheet (e.g. is it INUSE, SUBMITTED, APPROVING, or COMPLETED, etc.) you may need to re-submit your changes and have the timesheet flow through the standard approval process again. These are not adjustments, but regular timesheet modifications made prior to extraction.
Users Creating Adjustments
Once a timesheet has been EXTRACTED or LOCKED, timesheet users can initiate an end user adjustment by clicking on the edit pencil icon for a particular timesheet on their Completed list of timesheets.
Timesheets that are in the process of having an end user adjustment applied (e.g. a pending adjustment), will appear on your Active list of timesheets.
You can delete a pending adjustment by clicking on the delete icon in your Active list. This will remove the adjustment details as well as any related pending approvals, approval history entries, etc.
Timesheets in the adjustment process will have a similar status as a regular timesheet, with an (Adjustment) tacked on to the end. Thus, you may see an entry in your active list with one of the following statuses:
INUSE (Adjustments)
SUBMITTED (Adjustments)
APPROVING (Adjustments)
COMPLETED (Adjustments)
DISAPPROVED (Adjustments)
During the save process, the system will trigger rating logic to determine various attributes that are to be recorded with the time entries.
Managers Creating Adjustments
Managers that want to create an end user adjustment on behalf of one of their users, can navigate to their People >> My People list of timesheets screen and click on the edit pencil icon (to edit or initiate an end user adjustment).
Managers can delete a pending adjustment by clicking on the delete icon on the appropriate row. This will remove the adjustment details as well as any related pending approvals, approval history entries, etc. The status will be reset to the previous LOCKED or EXTRACTED status.
Administrators Creating Adjustments
Administrators that want to create an end user adjustment on behalf of a user, can navigate to the People >> List list of timesheets screen and click on the edit icon (![]() ) to edit or initiate an end user adjustment. They would click on the adjustment icon (
) to edit or initiate an end user adjustment. They would click on the adjustment icon (![]() ) to initiate and Administrative Timesheet Adjustment.
) to initiate and Administrative Timesheet Adjustment.
Administrators can delete a pending adjustment by clicking on the delete icon on the appropriate row. This will remove the adjustment details as well as any related pending approvals, approval history entries, etc. The status will be reset to the previous LOCKED or EXTRACTED status.
Once the user has made the necessary adjustments on their timesheet they will need to submit the adjusted timesheet, which will flow through this user's current standard approval process.
As the final step of the submittal process, the user will be prompted for an adjustment Change Reason. This screen will contain a Change Reason comment window for every entry that changed on the timesheet (see the example below).
Pre-Defined Change Reasons
Your system can be configured to allow for the entry of free form text as the change reason, or the Unanet Administrator can provide a pre-defined set of Change Reasons for users to select from via the Admin >> Setup >> Change Reason screen. If no Change Reasons have been defined by the Administrator, free form text entries will be allowed (and the Change Reason drop-down list will not appear). When pre-defined Change Reasons exist, the text entry field will be disabled and the user will need to select a reason from the list of available options.
Your system can also be configured to support both approaches by enabling the Include Other Adjustment Change Reason (unatime.adjustment.allow_other_change_reason) property. When set to true, the Change Reason drop-down list will include an additional option of "Other", which when selected will allow the user to enter their own free form text. Thus, they will have the option of selecting a pre-defined reason code or providing their own custom reason.
The value displayed in the drop-down corresponds to the Change Reason Code and the value displayed in the text entry field is the Change Reason as defined on the Admin >> Setup >> Change Reason screen.
Note that the specific text in the text entry field is what is saved in the system database. Should the administrator subsequently change the Change Reason text associated with a Change Reason Code, the original text will remain with any timesheets having previously used those reasons.
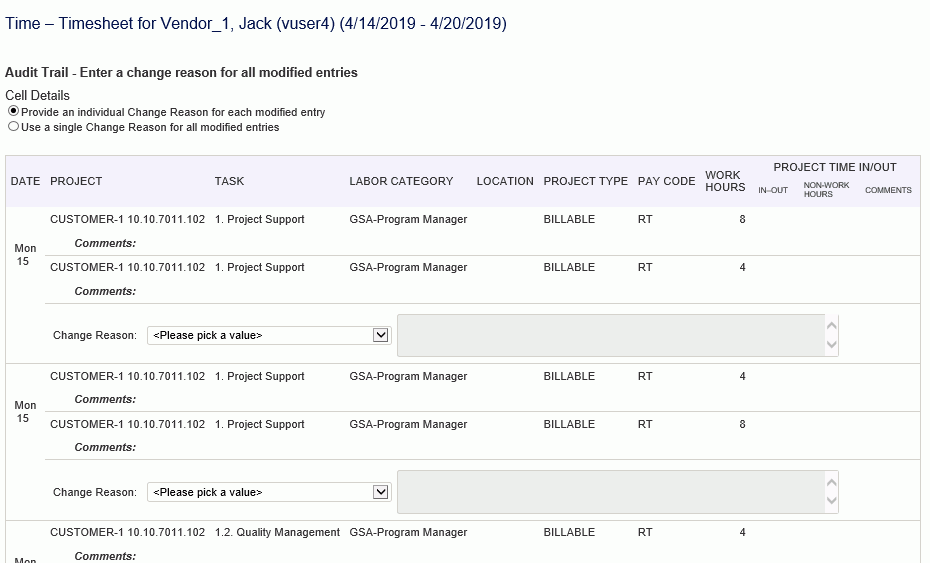
In some cases, when a user adjusts a single timesheet cell, other cells on the timesheet may be affected. This may happen, for example, if your Project Manager changed your original assignment details (e.g. changed a bill rate). When the adjusted timesheet is submitted, any entries on the row you are adjusting will be re-validated against the current project and assignment settings (and therefore may now contain some other difference). In these cases, the user will be prompted for Change Reasons for every cell on the row that changed.
You'll notice in certain cases, the system attempts to recognize these types of system generated changes and pre-populates the Change Reason comment indicating it was a system generated adjustment (associated with the user initiated adjustment of course). It is not always possible, however, for the system to determine if a change was directly user initiated or a result of a system generated adjustment, thus, users may need to populate change reasons for cells that they did not directly update.
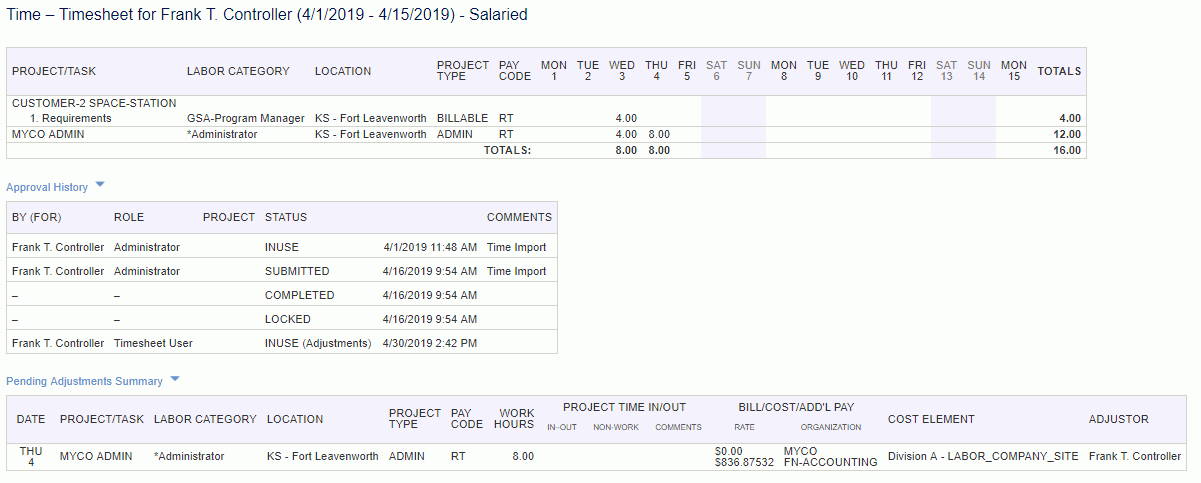
An example preview version of a submitted adjusted timesheet follows. Note the additional status entries in the Approval History section, and the Pending Adjustment section (which details any changes including the Adjustor).
Completed Adjustments
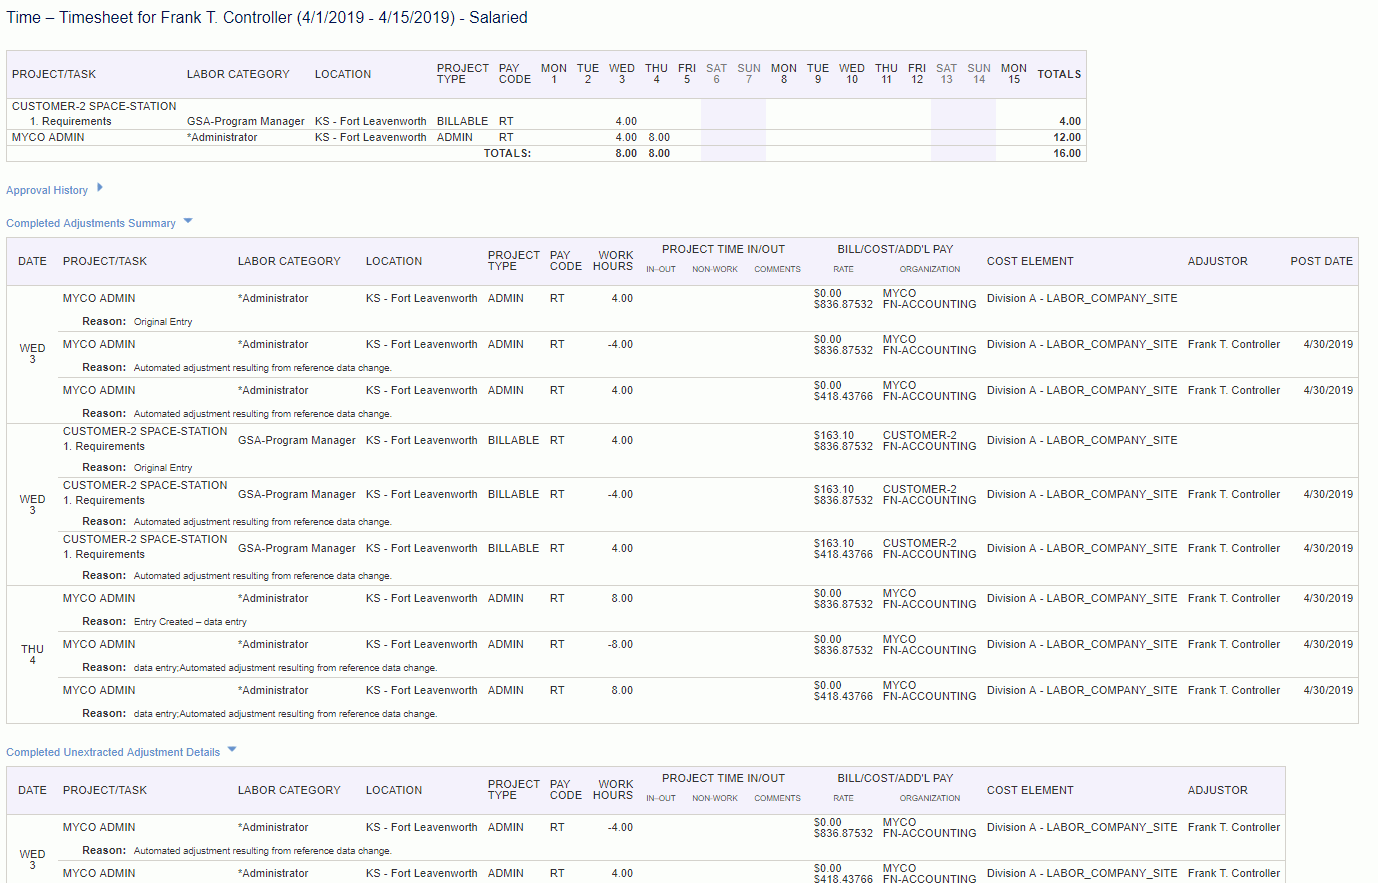
Once an end user adjustment has been approved by the final approver, the status of this timesheet will return to the original EXTRACTED status, and will be returned to your Completed Timesheets list. All appropriate adjustment entries are then updated as no longer being pending adjustments, but rather approved adjustments with a post date equal to the completed date.
The adjustment details that were previously displayed in the Pending Adjustment section on the preview version the timesheet will now be displayed in the Completed Adjustments section of the preview.
Adjustment Details - Section Types
Depending on the state of a particular adjustment entry, it may appear in one of the following sections in the timesheet preview:
Adjustment that have been marked 'Extracted' via the Time Export function will appear in this section of the preview screen.
Reason:
The text that will appear in the Reason field will vary and may include the following:
Example Selection Criteria
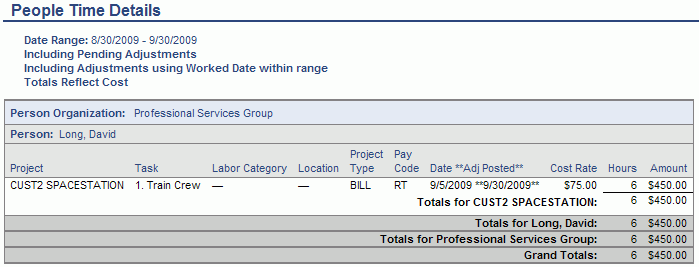
Many of the reports in Unanet provide the user with options on the selection criteria screen to choose how adjustments should be included in the output. The example below from the Project Time Detail report shows several of the common options. On some reports, however, the options differ (e.g. there may be no option to include pending adjustments, or, they may always be included based on work date, etc.).

You have the option to either include:
No Adjustments -- this means that the report output will not contain any adjustment information. The originally submitted timesheet is all that will be included.
Adjustments using Posted Date within Range -- this means that the report output will include adjustment details that have a post date that falls within the selection criteria date range. Note that these adjustments could apply to work dates outside of the report selection criteria date range -- but happened to be posted within this range. This may be very common if you make adjustments during this period for last period. This option may be useful if you are trying to illustrate, for example, this periods details plus any adjustments entered during this period for any past periods.
Adjustments using Worked Date within Range -- this means that the report output will included adjustment details that apply to the actual calendar days within the selection criteria date range regardless of when the adjustments were posted. This option may be useful if you are trying to illustrate, for example, the current adjusted view of a particular time period. This is the default setting.
Additionally, you can choose to:
Include Pending Adjustments -- This option will only appear if your system is configured with the unatime.end_user_adjustment.enable property set to true. If it is set, the pending adjustment details are included in report output by default (e.g. the box is checked) as they are more likely to reflect the current view. You do have the option, however, to not include these details by un-checking this check box.
Show Adjustment Details -- when this option is checked, the report output will include original entries, any associated backed out adjustment entries and the resulting adjusted entries. By default, the intermediate adjustment details are not included in the output (only the resulting entries are included). See the two examples below.
Timesheet Post Date Tidbits
The Post Date field related to each timesheet cell entry will be populated as follows:
Regular Time Entries -- The Post Date field stamped on regular (non-adjustment) timesheet entries will be the same as the Work Date for that entry. Regular / Original timesheet entries will always have the Post Date equal to the Work Date.
Administrative Adjustments -- When a Unanet Administrator enters a timesheet adjustment via the Administrative Timesheet Adjustment feature, the Administrator has the option of setting the Post Date and as such it will reflect whatever the Administrator entered. Note that the post date must be >= the timesheet cell work date being adjusted.
End User Adjustments -- When an End User Timesheet Adjustment is initially entered, the Post Date stamped on the record is equal to the Work Date for that timesheet cell. Once the Adjustment entry has been approved by the final approver, however, the Post Date is updated to reflect that final approval date.
Person Profile >> Rate Tab Adjustments -- For those adjustments resulting from an Administrative change to a person's profile rate tab information, the post date will be set to the date of the change (ie today's date).
Person Profile >> Person Dilution Adjustments -- For those adjustments resulting from an Administrative change to a person's profile dilution screen entry, the post date will be set to the latest un-extracted post date (if any un-extracted adjustments already exist on that timesheet), otherwise, today's date.
Time Import Adjustments -- For those adjustments resulting from an Administrative user importing time, the file can optionally include a specific post date value, or if not provided, the run date of the import (ie today's date) will be used.
When using a Weekly Overlap or Every Two Weeks Overlap time period type, you may want to enable the Prevent Posting On Weekly or Every Two Weeks Overlap Day (unatime.prevent_post_on_weekly_overlap) property.
While your business policy may dictate a specific scheme for the use of post date, one common practice is to set the post date to a date in the current time period. Doing so will allow you to include in your time extract any adjustments for any prior periods along with the most recent regular timesheets, by selecting the adjustment option 'include adjustments based on post date'.
Note: This Post Date should not be confused with the Post Date set during any of the Financials Posting activities.
In this example, you'll notice the original entry, the associated backed out entry and then the resulting adjusted entry are all included in the details.
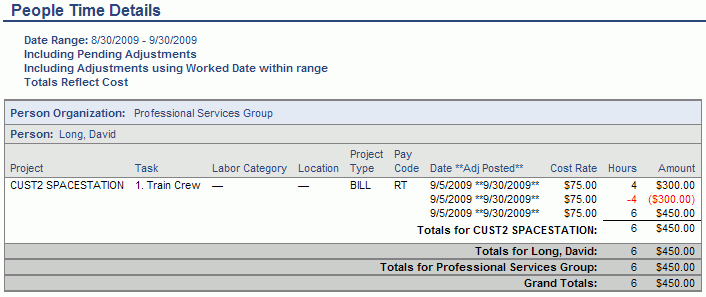
This is the same report, without the original and back out adjustment entries displayed (only the resulting entries are included).
